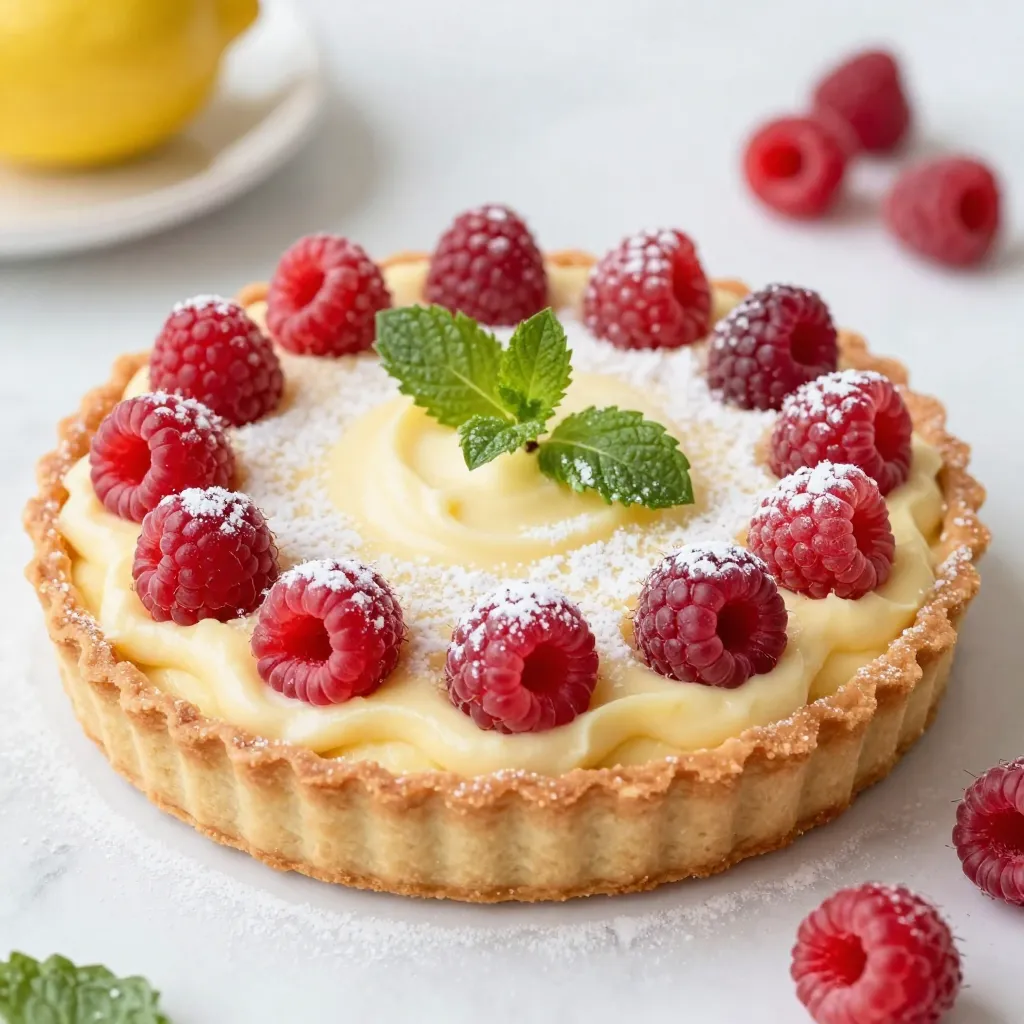
Are you ready for a dessert that bursts with flavor? My Raspberry Lemon Tart is both sweet and tangy. This dessert lets you enjoy the fresh taste of summer in every bite. I’m here to guide you through the simple steps to create this delightful treat. Whether you’re a baking pro or a beginner, this tart will impress everyone at your table. Let’s get started on this refreshing recipe!
Why I Love This Recipe
- Bright and Tangy Flavor: The combination of fresh raspberries and zesty lemon creates a refreshing tart that’s perfect for any occasion.
- Beautiful Presentation: This tart looks stunning on any dessert table, especially when garnished with mint and powdered sugar.
- Perfect Balance of Sweetness: The sweetness of the raspberries complements the tartness of the lemon, making every bite a delightful experience.
- Easy to Make: With simple ingredients and straightforward steps, this recipe is approachable for bakers of all skill levels.
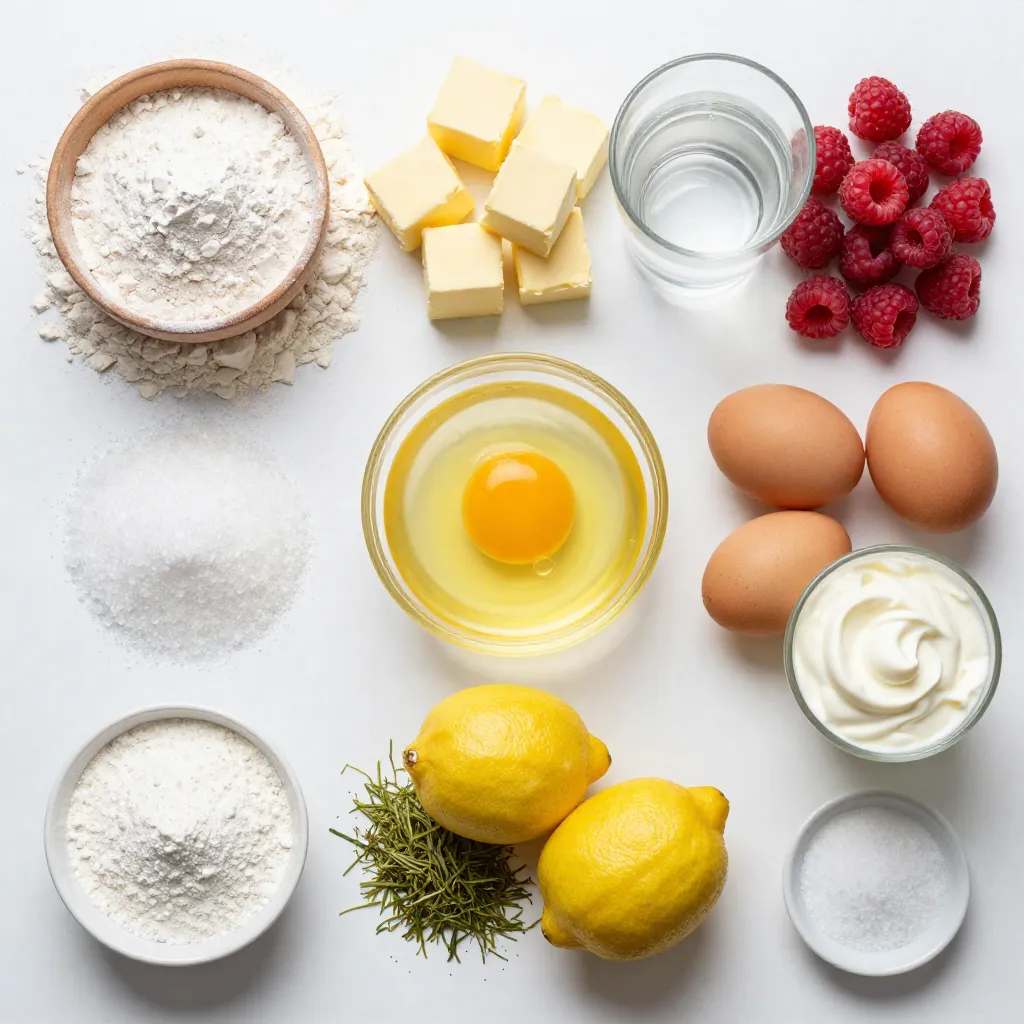
Ingredients
Key Ingredients for the Tart Crust
To make the tart crust, you need just a few simple items. Here’s what you’ll need:
– 1 ½ cups all-purpose flour
– ½ cup powdered sugar
– ½ cup unsalted butter, chilled and cubed
– 1 large egg yolk
– 2 tablespoons ice water
These ingredients work together to create a flaky and tasty crust. The butter adds richness, while the powdered sugar gives it a sweet touch.
Ingredients for the Lemon Filling
The lemon filling is what makes this dessert shine. Gather these fresh ingredients:
– 1 cup fresh raspberries
– 1 cup granulated sugar
– 3 large eggs
– ½ cup freshly squeezed lemon juice
– Zest of 2 lemons
– ¼ cup heavy cream
– 1 tablespoon cornstarch
– A pinch of salt
The raspberries bring a burst of flavor. The lemon juice and zest give it that zesty kick.
Optional Garnishes and Toppings
For a beautiful finish, consider these fun toppings:
– Powdered sugar for dusting
– Whole raspberries for decoration
– A sprig of mint for color
These garnishes add flair to your tart. They also make it look extra special when you serve it.
Step-by-Step Instructions
Making the Tart Crust
To start, gather your ingredients for the tart crust. You need:
– 1 ½ cups all-purpose flour
– ½ cup powdered sugar
– ½ cup unsalted butter, chilled and cubed
– 1 large egg yolk
– 2 tablespoons ice water
First, place the flour and powdered sugar into a food processor. Pulse to mix them. Next, add the chilled butter. Pulse again until the mix looks like coarse crumbs.
Now, add the egg yolk and ice water. Pulse until the dough starts to come together. Shape the dough into a disc, wrap it in plastic wrap, and chill it for at least 30 minutes.
Preparing the Lemon Raspberry Filling
While the dough chills, prepare the filling. Gather these ingredients:
– 1 cup fresh raspberries
– 1 cup granulated sugar
– 3 large eggs
– ½ cup freshly squeezed lemon juice
– Zest of 2 lemons
– ¼ cup heavy cream
– 1 tablespoon cornstarch
– A pinch of salt
In a mixing bowl, whisk together the sugar, cornstarch, and salt. Beat in the eggs, lemon juice, cream, and lemon zest. Whisk until smooth. Now, gently fold in the fresh raspberries. Be careful not to crush them.
Baking and Cooling the Tart
Next, preheat your oven to 350°F (175°C).
Roll out the chilled dough on a floured surface. Fit it into a 9-inch tart pan, trimming any extra dough. Prick the bottom with a fork.
To blind bake, cover the crust with parchment paper and add pie weights or dried beans. Bake for 15 minutes. Remove the weights and parchment, then bake for another 10 minutes until the crust is light golden. Let it cool completely.
Pour the raspberry lemon filling into the cooled tart shell. Bake it for 25-30 minutes. The filling should be set but still have a slight jiggle.
Cool the tart at room temperature. After that, refrigerate it for at least 2 hours. This helps the filling firm up. Enjoy this fresh dessert!
Tips & Tricks
Achieving the Perfect Tart Crust
To get a great tart crust, use cold butter. This helps the crust stay flaky. When mixing, pulse the butter with flour and sugar until it looks like crumbs. Be careful not to overwork the dough. After you shape it, chill it for at least 30 minutes. This step makes the crust easier to roll out.
Ensuring a Smooth Filling
For a smooth filling, whisk your ingredients well. Start with sugar and cornstarch, then add eggs. Mix in the lemon juice and cream next. The lemon zest adds flavor, so don’t skip it! When you fold in the raspberries, be gentle. You want them whole and fresh, not mushy.
Presentation Tips for an Attractive Dessert
Make your tart shine with a dusting of powdered sugar. This adds a sweet touch and looks pretty. Add whole raspberries on top for color. A sprig of mint brings freshness and makes it pop. Arrange everything neatly for the best look. Your guests will be impressed!
Pro Tips
- Chill the Dough: Ensure the dough is well-chilled before rolling out. This helps prevent shrinking during baking.
- Don’t Overmix: When folding in the raspberries, be gentle to maintain their shape and prevent them from breaking down.
- Check for Doneness: The filling should be set with a slight jiggle in the center. This ensures a creamy texture once cooled.
- Serving Suggestions: Pair with a dollop of whipped cream or a scoop of vanilla ice cream for an extra indulgent treat!
Variations
Substituting Ingredients
You can swap some ingredients in this tart to suit your taste. For the crust, use whole wheat flour for a nutty flavor. You can also replace unsalted butter with coconut oil for a dairy-free option. If you want less sugar, try using honey or maple syrup in the filling. Just remember to adjust the amounts since these sweeteners are different.
Alternative Flavor Combinations
If you want to mix things up, consider adding different fruits. Blueberries or strawberries blend well with lemon, too. You could even try adding a dash of vanilla extract or a hint of ginger for extra flair. Each fruit and flavor will change the taste and make the tart your own.
Mini Raspberry Lemon Tarts
Making mini tarts is a fun twist! Use a muffin tin instead of a tart pan. Roll out the dough and cut it into small circles. Press these circles into each muffin cup. Fill them just like the big tart and bake. These bite-sized treats are perfect for parties or gatherings. Plus, they look cute on a dessert table!
Storage Info
How to Store Leftover Tart
To store leftover raspberry lemon tart, cover it tightly with plastic wrap or foil. This keeps the tart fresh and protects it from odors in the fridge. Place it in the refrigerator for up to three days.
Freezing Instructions
You can freeze the tart if you have extra slices. Wrap the tart well in plastic wrap and then in foil. This helps avoid freezer burn. You can freeze it for up to three months. When ready to eat, thaw it in the fridge overnight.
Best Practices to Maintain Freshness
For the best taste, eat the tart within a few days. If you freeze it, wait to add toppings until after thawing. Avoid storing it near strong-smelling foods, as it can absorb odors.
FAQs
Can I use frozen raspberries?
Yes, you can use frozen raspberries. They work well in this recipe. Just make sure to thaw and drain them before adding them to the filling. This helps avoid extra moisture in the tart. Frozen berries can be a great option when fresh ones are not available.
How do I know when the tart is done baking?
You can tell the tart is done when the filling has a slight jiggle in the center. It should look set around the edges. Bake it for 25-30 minutes at 350°F (175°C). Keep an eye on it to prevent overbaking. A perfectly baked tart will have a soft filling that firms up as it cools.
Can I make the tart ahead of time?
Yes, making the tart ahead of time is a great idea! You can prepare the tart crust and filling a day in advance. Just store it in the fridge after baking. Allow it to cool completely before covering it. This way, the flavors meld beautifully, and you save time on the day you plan to serve it.
You’ve learned how to make a delicious raspberry lemon tart. We covered key ingredients, from the perfect crust to a smooth filling. The tips help you craft a beautiful dessert every time. Variations let you get creative, and storage tips keep leftovers fresh.
Now, gather your tools and ingredients. Enjoy making your tart and sharing it with friends! Happy bakin